• photography
  • work
  • about
Menu

Karen Taylor Quinn

  • photography
  • work
  • about
×

Rum Old Fashioned > Regular Old Fashioned

Karen Quinn October 1, 2021

I love to drink cocktails—and talk about them, and ask other people to make me them—but the true barman in my household is Jarrett, and he introduced me to this handsome, brooding twist on the beloved traditional. It’s smooth, warm, and sophisticated, just like Jarrett (!), but luckily Jarrett doesn’t do #content, so I have stolen it and here it is.

Is it really better than a regular Old Fashioned? I think so. (Though I love regular Old Fashioneds, too.) Wanna fight about it on social media? Let’s do it.

How to Rum Old Fashioned

Simple and straightforward, the Rum Old Fashioned would make a great house cocktail for beginners and experienced barmen and women alike. The key is this: Choose a complex, smooth, aged sipping rum that’ll serve as the backbone of the drink. Go to a cool liquor store and look for bottles marked añejo, viejo, or reserva, in the $50–$75 range. Bonus if you can find something that’s aged in an interesting way, like in sherry barrels. If you’re into rum, grab two or three options so you can experiment.

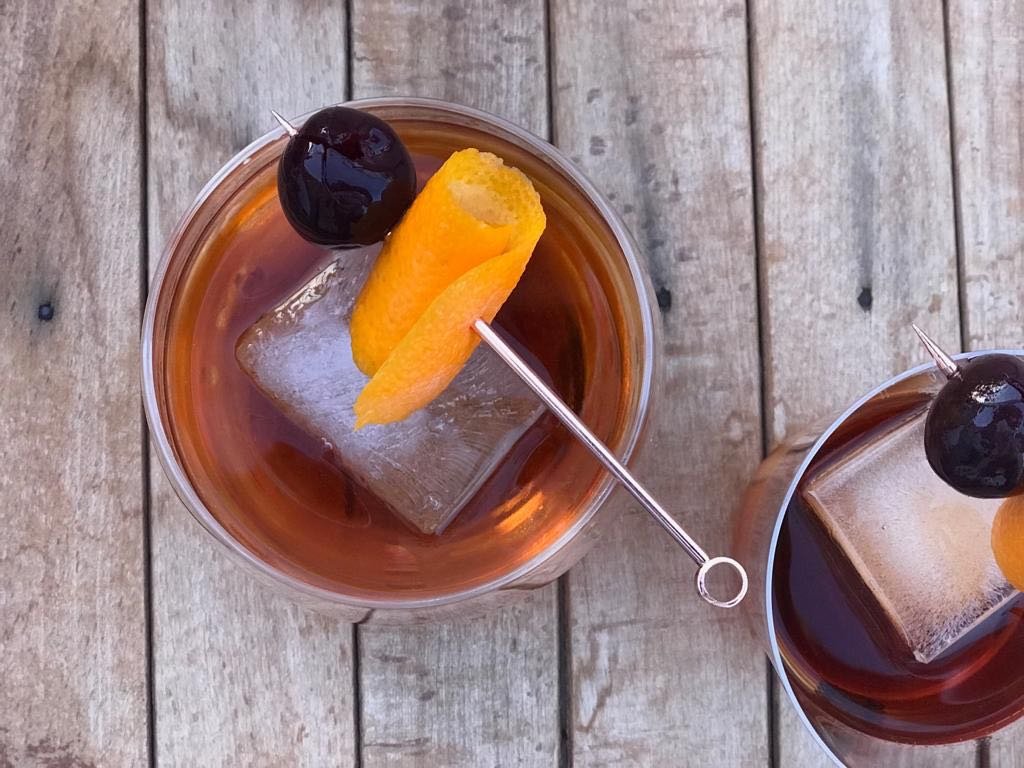
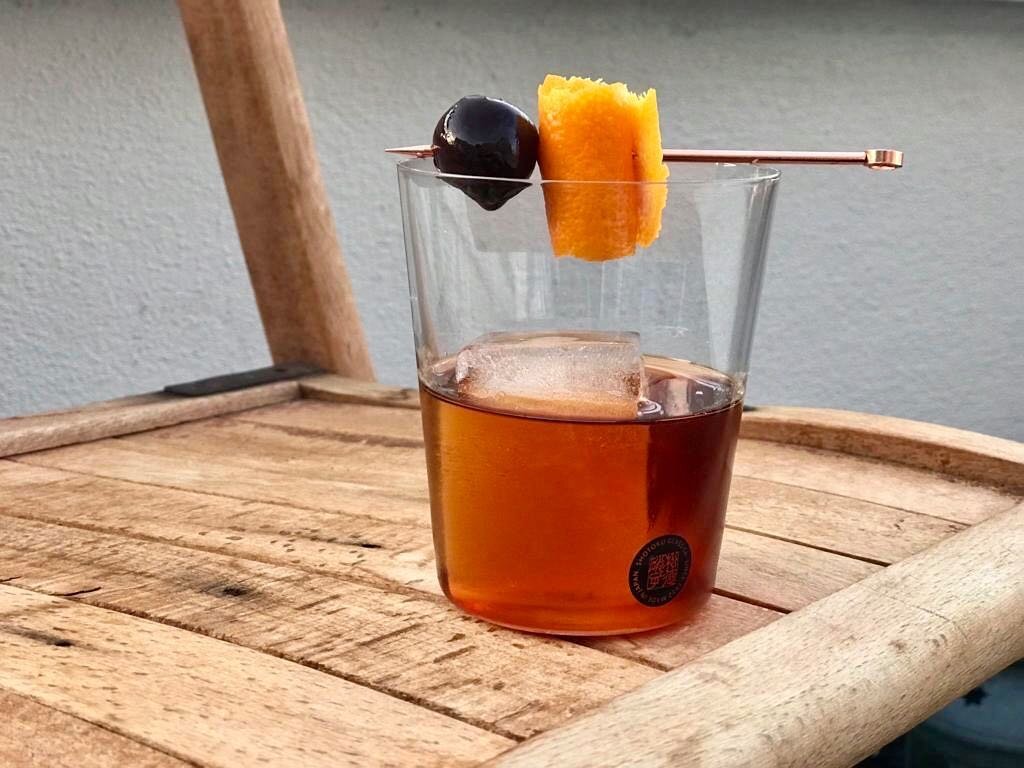
Some people like Old Fashioneds with muddled orange and Maraschino cherry, but I happen to believe that’s a disgrace, especially if you’re using an interesting or special spirit that will only be overpowered by too much fruity sweetness. Stick with the classic and elegant garnish: an orange twist and a brandied cherry.

Time: Five minutes or so
Serves: One cocktail

INGREDIENTS
  • 2 ounces good rum
  • 1/4 ounce simple syrup
  • 2 dashes Angustora bitters
  • A brandied cherry
  • Orange twist
  • Ice (big cubes are best)
  • 1. Combine rum, simple syrup, and bitters over ice.
    The bigger the cubes, the better, so you won’t dilute the drink.

    2. Stir with a long spoon until very cold.

    3. Strain into a rocks glass over fresh ice.

    4. Garnish with a brandied cherry and an orange twist.

    In recipes Tags cocktail hour
    Comment

    Grilled Oysters with Homemade Breadcrumbs

    Karen Quinn August 1, 2021

    On long, golden nights in August, there is no greater pleasure than eating fresh seafood en plein air. These grilled oysters—a surefire crowd-pleaser, even for your friends who think they don’t like oysters—are made with just a few simple ingredients and can be cooked entirely outdoors, on the grill, or prepped inside on a burner and finished on the grill, a la minute. Start with the biggest, saltiest oysters you can find locally (perhaps Wellfleets or Blue Points on the east coast, or Totten Inlets on the west coast), a good, sturdy loaf of stale bread, and you’re well on your way to a successful summery cookout.

    Time: 30ish minutes, plus time to shuck
    Serves: 4–6
    Drink: Rosé

    INGREDIENTS
  • 24–36 oysters, shucked and reserved in a cooler on ice
  • Half a loaf of stale, sturdy, artisan bread
  • Extra virgin olive oil
  • Two cloves garlic, minced
  • Half a shallot, minced
  • 2 tablespoons butter (plus more as needed)
  • A cup of roughly chopped fresh parsley
  • Two lemons
  • Salt and freshly ground pepper
  • 1. Grill bread
    Cut your bread into one-inch slices and brush with olive oil. Grill the bread (or fry in a cast-iron skillet) over medium-high heat until deep brown and crispy, about five minutes on each side. If you’re working with fresh bread instead of stale, follow with a ten-minute stint in a 350-degree oven to further dry it out.

    Set aside and let cool.

    2. Make breadcrumbs

    With a sturdy chef’s knife, cut your bread into cubes, then chop, chop, chop to make rustic breadcrumbs. It’ll probably take you 10 or 15 minutes—patience, Iago.

    If you’re short on time (or energy), just toss the bread into a food processor and pulse for a few minutes. This will create more uniform crumbs and is certainly easier, though I liked the rustic texture of the hand-made crumbs. You can also use store-bought breadcrumbs if you prefer.

    3. Toast and season breadcrumbs
    Melt two tablespoons of butter in a skillet over the grill or on a burner over medium-high heat. Add garlic and shallots and cook for 2 or 3 minutes, until fragrant and soft. Add the breadcrumbs, salt and pepper, and chopped parsley. Toss frequently until the whole mess is golden-brown and smells like heaven. Season with more salt and pepper to taste.

    Set aside and let cool. Steps 1–3 can be done up to five days in advance. Reserve breadcrumbs in a Ziploc or Tupperware at room temp.

    4. Assemble oysters; cut up lemon wedges
    Drain out most of the extra liquor from your shucked oysters. You want them to be moist, but not drowning in liquor. Arrange oysters on a tray, and cover each one with a spoonful of the toasted breadcrumbs.

    Cut up some lemon wedges and set aside.

    NOTE: If you’re not into wasting that precious oyster liquor, there are plenty of good uses for it! Add it to seafood stock, use it to deglaze a pan, or mix it into a Bloody Mary.

    5. Grill ’em up
    Place oysters shell-side down (obv) on your grill. Close the lid and cook for 8–10 minutes, or until the liquid under the breadcrumbs starts to bubble. (You don’t need to stress too much about over- or under-cooking; this is pretty forgiving.)

    If you don’t have a grill, you can broil them on a baking sheet instead, about 5 minutes.

    Remove oysters with tongs and set on a tray.

    6. Squeeze fresh lemons over the top, eat!
    They’ll be rippin’ hot when they’re first off the grill, so give them a couple minutes to cool off. Then, squeeze some fresh lemon juice over all the oysters and serve with more lemon wedges to use as needed. Eat up!

    In recipes Tags cocktail hour
    Comment

    Glassy Chickpeas with Cumin and Lime

    Karen Quinn July 1, 2021

    Chickpeas that are supposed to be crunchy very often turn out mildly crispy, or worse, kinda soft and stale-tasting. I’ve done a fair amount of testing and I’ve found only one way to make it work: dry, then fry. The result is a truly glassy snack that you can eat by the handful.

    Time: 20 minutes
    Drink: A margarita or a traditional daiquiri

    INGREDIENTS

  • One can chickpeas, drained and rinsed
  • 1/2 cup olive oil
  • 2 T ground cumin
  • Kosher salt
  • Fresh-ground pepper
  • Zest of one lime

  • 1. Preheat oven to 400 F

    2. Prep the chickpeas
    Spread the drained, rinsed chickpeas on a baking sheet. Use a paper towel to pat them dry.

    3. Dry roast for 5 minutes; remove from oven
    Put the sheet pan in the oven for 5 minutes. This dries the outside of the chickpeas without cooking or dehydrating the center—key to avoiding that soft, stale vibe. Remove from the oven.

    4. Prepare your frying setup
    Set a large plate lined with paper towels next to the stove. Set out a slotted spoon. You’ll want to work quickly once the oil starts heating up.

    In a medium-sized bowl, combine cumin, lime zest, and a bunch of kosher salt and pepper (just do it by eye—you can always add more).

    Add about a half a cup of olive oil into a deep, non-stick skillet or wide-bottom pot, so the whole bottom is coated. Turn the heat to medium-high and preheat the oil until it’s shimmering but not smoking, about five minutes, depending on your burner. (If you’re not sure, splash a bit of water into the oil—if it pops and spatters, it’s hot enough.)

    5. Fry your chickpeas for 8–12 min
    Drop the chickpeas into the hot oil. They’ll splatter and pop at first, so use an apron and a splatter screen if you have one. (I hold the lid of a large pot like a shield in front of my neck and lower face, like a MEDIEVAL KNIGHT.) Cook until they’re deep golden-brown, about 12 minutes. Shake the pan or stir frequently to ensure even cooking.

    Use a slotted spoon to remove them from the oil and place on the paper towels to drain.

    6. Season while they’re still hot. Rest briefly.
    Let the chickpeas drain for a few minutes then transfer to the bowl with the salt, pepper, cumin, and lime zest. Toss to coat. There will be some extra seasoning in the bottom of the bowl. Save it for next time!

    Before you use them, rest for another few minutes on the paper towel—they’ll crisp up further as they cool.

    7. Eat!
    The best partttt, yo.

    In recipes Tags cocktail hour
    Comment

    Anchovies, Butter, and Toast

    Karen Quinn February 12, 2021

    People often ask us for Seattle restaurant recommendations, and at the very top of my list for the last ten years and counting is the inimitable Spinasse. When I close my eyes I can picture the dining room: all natural wood, lace, and brass, with elegant glassware and refined but relaxed service, my favorite kind. The space is warm and inviting, small but never cramped, with a long and spacious bar that looks directly into the kitchen. They make a mean Negroni, a plate of life-altering Tajarin, and a heavenly uova con fonduta. And the first bite of the evening is always a tiny slice of toast, smeared with really good butter and topped with a glossy, oil-packed anchovy. It is the perfect bite: crunchy, salty, and rich—a tiny delight to usher you into an evening full of them.

    I brought this lovely tradition home several years ago and my friend Dylan and I each now keep it in the regular rotation for dinner parties. It’s easy to whip up in a pinch and feels unique and special.

    Simple sophistication.

    This is fancy finger food at its finest, and ridiculously easy to make. The key is this: Use good butter. These little delights are made of three things, no more, no less. Since the baguette is toasted with olive oil, it doesn’t have to be a top-shelf baguette to work; likewise, the anchovies should be of high-quality, but nothing fancy. (I like Ortiz, which you can get at just about any grocery store.) The butter is what matters: stick to an unsalted, European-style butter like Plugrá or Kerry Gold (also available at most grocery stores) and you can’t go wrong.

    Time: 20 minutes
    Serves: Hors d’oeuvres for 4–10
    Drink: Sparkling wine

    INGREDIENTS
  • Half a baguette
  • Good, unsalted European-style butter, like Plugrá
  • One jar or tin of olive-oil packed anchovies
  • Olive oil, as needed
  • 1. Preheat oven to 400 F

    2. Slice your baguette
    Using a sharp and sturdy knife, cut your baguette into super-thin slices. Go as thin as you can—when toasted it should be more like a cracker than a slice of bread.

    Work ahead: You can cut up the baguette and freeze the slices in a gallon bag for later use. (This is especially helpful when you’re throwing a last-minute cocktail party.) When you’re ready to make them, no need to defrost—they’ll toast up just fine. Just pull them out of the freezer and continue on to step three.

    3. Spread pieces on a sheet pan; drizzle with olive oil
    Place all the slices on a sheet pan and drizzle or brush lightly with olive oil. You don’t need a ton here, just enough to crisp up the edges here and there. Try to keep the edges from touching so they’ll crisp up better.

    4. Toast in the oven until golden-brown
    This should take about 7–10 minutes, but start checking on them after 5. They can burn quickly because they’re so thin.

    5. Remove from oven; let cool

    6. Spread cold butter on each crostini; top with an anchovy
    Using fridge-temperature butter and working on a cool surface (i.e. not the hot sheen pan you just used), spread some butter on each piece of toast.

    Top each with an anchovy (or half an anchovy if you’re working with big ones). I like to pull each anchovy out of the jar or tin and wick the extra oil off with my fingers, so it’s not too gloopy on the toast.

    7. Arrange on a platter; reserve in the fridge
    Arrange them on a platter (or, if you’re doing a seated dinner, you can plate up each one on a tiny plate) and reserve in the fridge until you’re ready to use. The butter should be cool and opaque, not melted.

    8. Serve!
    Because all the ingredients involved are beige-ish, it’ll never look like a stunning colorful dish, and that is A-OK. As soon as people taste them they’ll know what’s up.

    In recipes Tags cocktail hour
    Comment

    Search Posts

    Recipe Archive
    • cocktail hour
    • dinner
    • breakfast
     

    Featured Posts

    Featured
    dinner
    Stone Fruit and Arugula Salad with Gorgonzola and Roasted Almonds
    dinner
    dinner
    dinner
    Soy and Ginger Marinated Flank Steak
    dinner
    dinner
    cocktail hour
    Rum Old Fashioned > Regular Old Fashioned
    cocktail hour
    cocktail hour
    cocktail hour
    Grilled Oysters with Homemade Breadcrumbs
    cocktail hour
    cocktail hour
    cocktail hour
    Glassy Chickpeas with Cumin and Lime
    cocktail hour
    cocktail hour
    cocktail hour
    Anchovies, Butter, and Toast
    cocktail hour
    cocktail hour
    breakfast
    Ultra-Soft Rhubarb Rolls with Cream Cheese Frosting
    breakfast
    breakfast

    Powered by Squarespace